
The customizations below are regarding the versions 1.1 and 1.2 of StudioPress (in)SPYR. An update covering version 1.5 and up is available here.
Over at my Dutch blog wpZaken, I am using a slightly customized version of the StudioPress (in)SPYR theme – the Blue Base style to be exact. Yesterday, I wrote a post about setting-up the (in)SPYR Subscribe widget for Google Feed burner.
One of the things that kept me back from purchasing this StudioPress Community theme is that it does not come with a widgetized footer.
Fortunately, when I decided to give it a try, I discovered that adding a widgetized footer is not difficult at all. It will be my pleasure to show you how.
The Default (in)SPYR Footer
Let us first have a look at the default footer of the (in)SPYR theme:

The default footer comprehends three parts:
- the name of the website
- links to three social networks – by default Twitter, Facebook, and Google+
- the footer credits
In default state, you will not find any widgetized footer areas on the Widgets page. But that is exactly what we are going to do: adding three widgetized footer areas.
When I was exploring the functions.php file of the (in)SPYR child theme, I discovered that the necessary code is already there, but it is commented out.
So first thing to do is open the functions.php file and search for this code:
 /*** Footer Widgets

add_theme_support('genesis-footer-widgets',3 ); */
And change it to
 /*** Footer Widgets */

add_theme_support('genesis-footer-widgets',3 );
Basically, it is a matter of replacing the */ from end at the second line to the end of the first line.
When you are done and reload the Widgets page, you will see that you have added three fresh footer areas to the theme. You can already drag some widgets to these footer areas, but the CSS code available for the widgetized footer is probably is not quite what you want it to be:

There are of course unlimited possibilities when it comes to adding a background to the widgetized footer. Since I like the background of the social footer, I decided to use the same footer_bg.png file for the widgetized footer.
In case you want to follow along; open the style.css file of the (in)SPYR theme. Find /*** Footer Widgets */. When your editor is displaying line numbers, it should be line #362.
In the first line replace
background-color: #f5f5f5;
with
background: url("images/footer_bg.png") repeat;
And since the default text color for the footer widgetized footer is a little bit too dark for my taste, I have added a font color at the end of the same CSS line just before the closing curly brace:
color: #595959;
Save the CSS file.
There is just one more step to take. Let us first increase the padding above the widget titles in the footer. Search for this line – line #365:
#footer-widgets .widget { background:none;border:none;margin:0 0 15px;padding:0; }
replace
padding: 0;
with
padding: 50px 0 20px 0;
Do not forget to save your CSS file.
The Extended (in)SPYR Footer
That is it. Your (in)SPYR footer should now look like this:
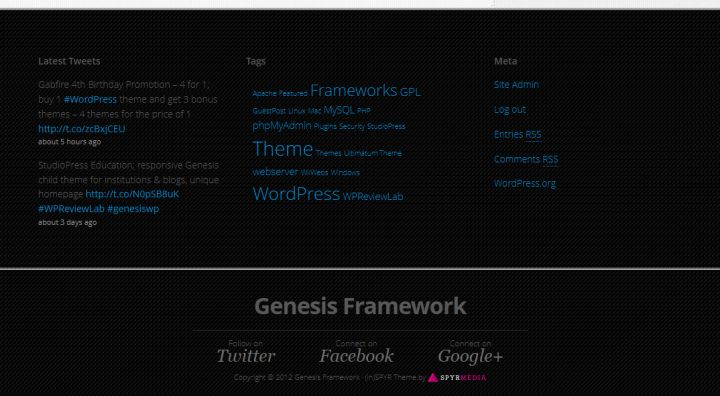
In case you do not like the double line at the top and bottom of the widgetized footer, you will have to shave the footer_bg.png file, since these two lines are included in this PNG.
Fire up Photoshop or a graphics editor like InfranView (for Windows) and crop it. You can of course also decide to use a different background file.
Good luck adding the extended footer to your StudioPress (in)SPYR theme.
Hello,
I would like to add a widgetized footer to my (in)spyr theme, but my functions.php file doesn’t have anything like this code:
/*** Footer Widgets
add_theme_support(‘genesis-footer-widgets’,3 ); */
Instead, my functions.php has the following:
<?php /***
Functions
(in)SPYR Theme
SPYRmedia.com
= WARNING =
DO NOT edit this file if you wish to install future releases of (in)SPYR. All changes to
this file will be overwritten upon update. To retain the freedom to install future versions
we recommend that all theme modifications must happen via an extension plugin.
*/
/*** Defaults */
define('INSPYR_VERSION','1.5');
define('INSPYR_PATH',dirname(__FILE__));
define('INSPYR_URL',get_stylesheet_directory_uri());
/*** Init */
require_once(get_template_directory() . '/lib/init.php');
require_once('inc/init.php');
Any ideas?
Thank you
Hello Madalina,
Version 1.5 of the inSPYR theme is quite different from the previous version 1.2.
The warning at the top of the page is legit of course. In case you prefer to preserve your modifications, you can always turn to the Genesis Extender plugin to apply your modifications.
Since I am still using this theme for wpZaken.nl, and also intend to upgrade to 1.5, I will need to have a look at this. Please give me a couple of days to sort this out.
Take care,
Wil Ransz
Thank you for the reply.
I’m definitely interested in the modifications when you figure it out!
Madalina
Hello Madalina,
Last Friday, I have published an update for (in)SPYR 1.5+. It took much longer than expected, sorry for that.
Take care – Wil