Until last week, e-mail subscribers to this blog were served through FeedBurner. Last Monday, the e-mail addresses of these subscribers were moved to MailChimp.
In case you are thinking about moving from FeedBurner to MailChimp too, this post will show you how to accomplish that successfully.
When you are not convinced yet why you should migrate over to MailChimp, then consider the following benefits. You can choose from 30+ templates for your e-mail message, or code your own.
You are able to integrate dozens of web services, like for example Eventbrite, Facebook, Google Analytics, Twitter, and PayPal. You get insights from reports informing you about open and click rates for every mailing. You can have MailChimp share your campaigns to your social networks.
Creating a MailChimp account
When you do not have a MailChimp account yet, then head over to MailChimp and create one. It is free. Even more, accounts with up to 2,000 subscribers are free.
MailChimp has a ton of features, and in the beginning it is very easy to feel lost. My goal with this post is to shed some light in the twilight zone.
When you log in, you will see your account name in the upper right corner of the window. From the drop-down menu, you have access to:
- Notifications – messages from MailChimp
- Profile – manage your username and password
- Account – summary of your subscribers and dispatched e-mails
- Support – opens the MailChimp Knowledge Base in a new browser tab
On the Profile en Account page you find another menu. Check out the Account settings. These include:
- Account details – check the timezone, date and number formats
- Account users – invite co-workers or partners to collaborate on campaigns as users
- Account security – safety questions and optional two-factor verification
- Contact information – contact details of the account owner
- Verified domains – send e-mails to confirm that you are the owner of the domain(s) used
- Export my data – backup your account
- Pause or delete account – deactivate or even completely remove the account
Before sending e-mails, you should definitely have a look at 1, 4 and 5. Make sure that MailChimp acts according the correct time zone, verify that the contact details are correct, and proof that you own the domain(s) used to send out e-mails.
Understanding the MailChimp Lingo
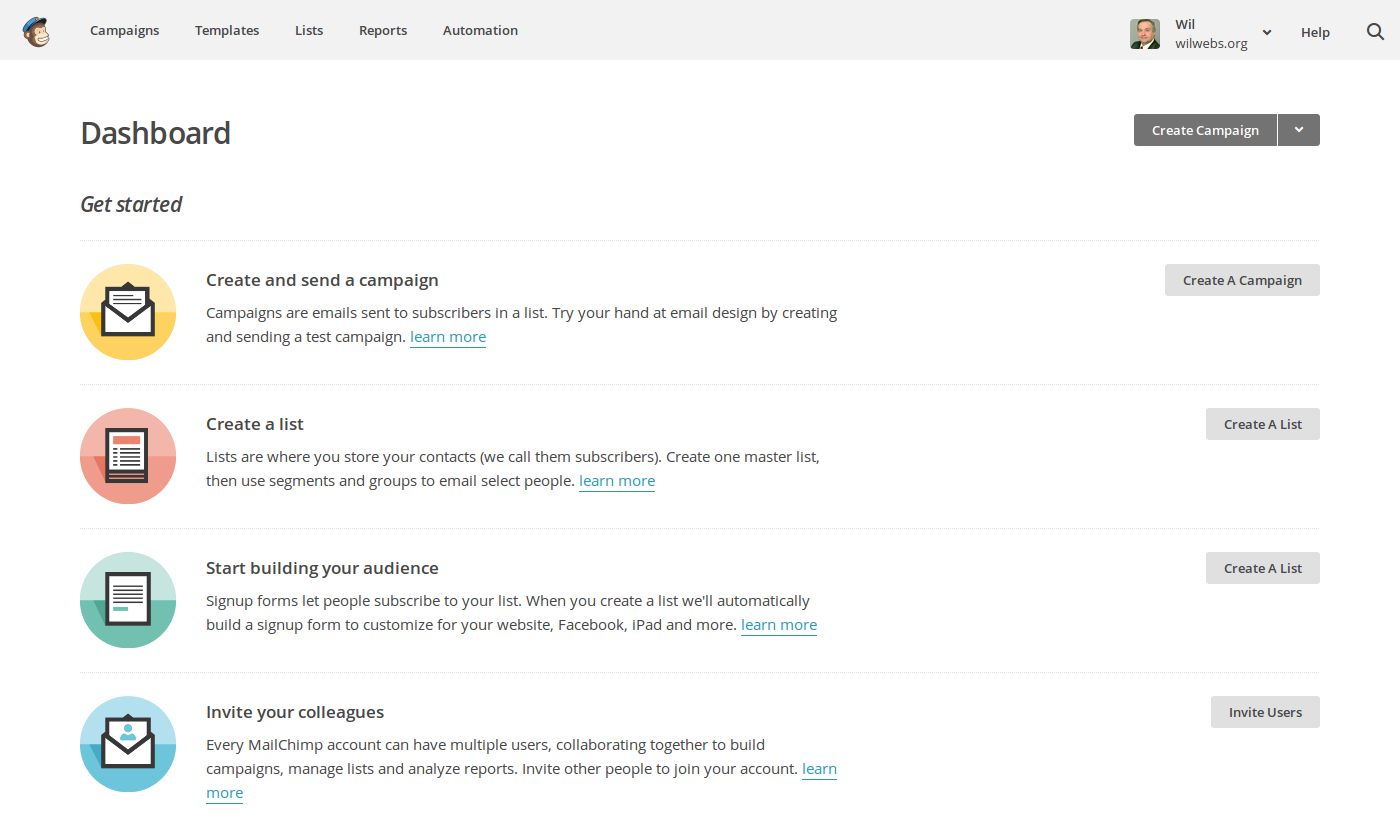 Petting Freddie, MailChimp’s mascotte, in the upper left corner will always bring you back to the dashboard. Initially it will look like the screen capture above. See it as a checklist to get you going.
It is important to distinguish a couple of terms:
- List – a collection of e-mail addresses that receive your e-mails
- Form – offered to your visitor so that they can subscribe to your mailings
- Templates – tools to help you styling your e-mail messages
- Campaign – one time or recurring e-mail marketing actions
An account can have more than one list. For example, the account wilwebs.org has three: Wilwebs.com, Theming WP, and HostingCaddie.
Even more, each blog has its own template and campaign too. But as long as the aggregated number of subscribers remains below 2,000, the MailChimp account will remain free.
Creating a MailChimp list
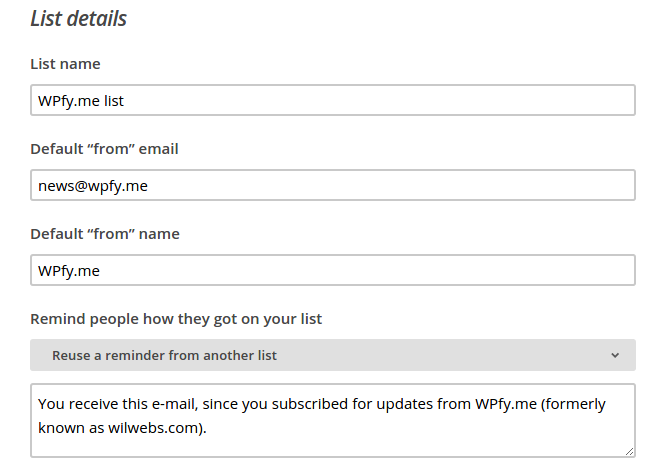 The top part of the Create List form – as shown above – will vary with each list. The bottom part is already filled out for you by MailChimp – it includes your contact details. These details are displayed at the bottom of every e-mail.
You can alter these contact details for individual lists when necessary. To change the default settings, or to verify these details for your lists, go to Account >> Account Settings >> Contact information. Please note that the contact details are included with every e-mail, together with the reminder why people are receiving your e-mail, and an unsubscribe link.
Importing your FeedBurner e-mail addresses
Now that you have created a list, you can import the e-mail addresses from FeedBurner.
Of course, you have to export those addresses first. You can do this via FeedBurner’s Subscription Management, located under the Publicize tab. Just click the CSV-link behind “Export:”. In my case, this leads to a list named wpfymeemailsubscribers.csv.
You should only import the active subscriptions into your MailChimp list. So before importing, you have to open the CSV-file in a spreadsheet, sort the list on the Status column, and remove the subscriptions with the status Pending Verification.
To make it easier over at MailChimp, entirely remove the columns Subscribed and Status, as well as the three column headings. Save the list again as a (new) CSV-file.
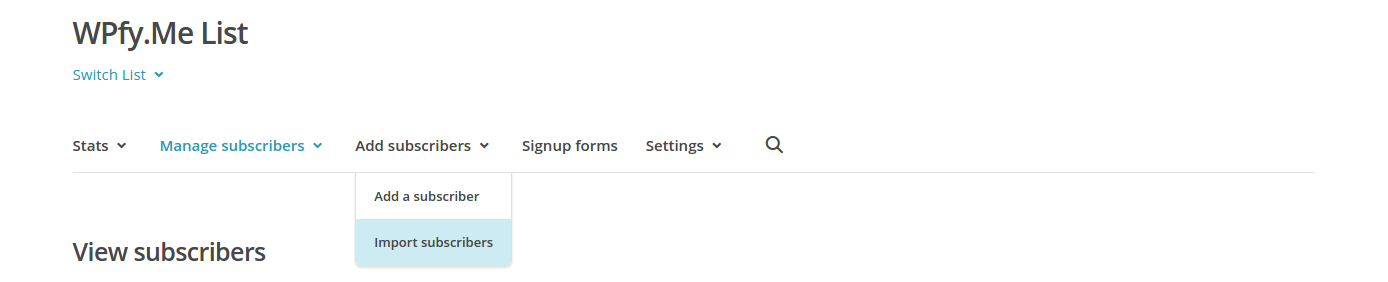 Go to your list with MailChimp. First click Add subscribers, and then Import subscribers.
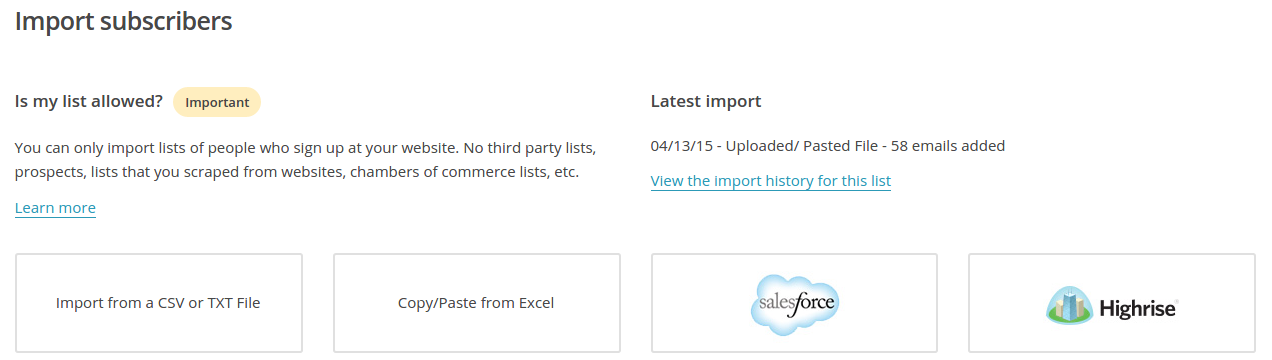 Select Import from a CSV or TXT file on the Import subscribers page.
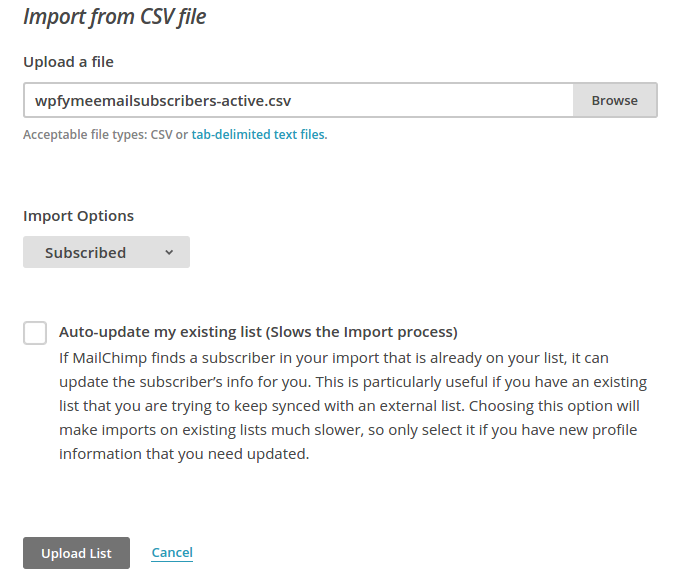 First a note about Auto-update. This feature can come in handy when you already have a list with MailChimp. By default, MailChimp skips all entries with already know e-mail addresses.
When you check Auto-update, MailChimp will act differently though. When it encounters a known e-mail address, it will check whether there are details in the record regarding, which are not yet included in your MailChimp list and add those values to your list. With other words, it gives you the opportunity to enrich your existing list.
Locate the CSV-file with the active FeedBurner subscriptions and hit the [Upload List]-button. That is it. Your FeedBurner address have been added to your MailChimp list.
Do not forget to deactivate your FeedBurner Feed (Publicize >> Delivery Options). Otherwise your subscribers will receive two e-mails with every new blog post – one from MailChimp, and another one from FeedBurner.
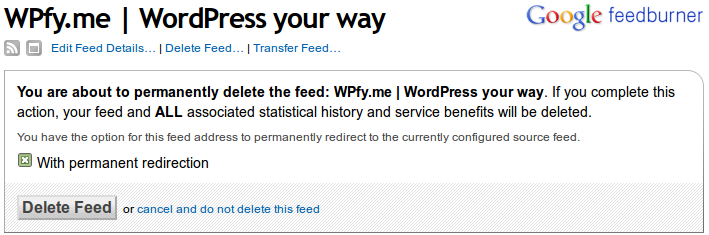 You probably also want to reclaim your feed from FeedBurner (with permanent redirection), so that the RSS Feed becomes http://domainname/feed again. Otherwise it will remain http://feeds.feedburner.com/feedname.
Creating a MailChimp Sign-up form
You need a sign-up form so that visitors are able to subscribe to your mailings. As with everything, MailChimp offers a ton of options, including a Facebook form and Tablet forms. The latter are very convenient for trade fairs, WordCamps and Meetups.
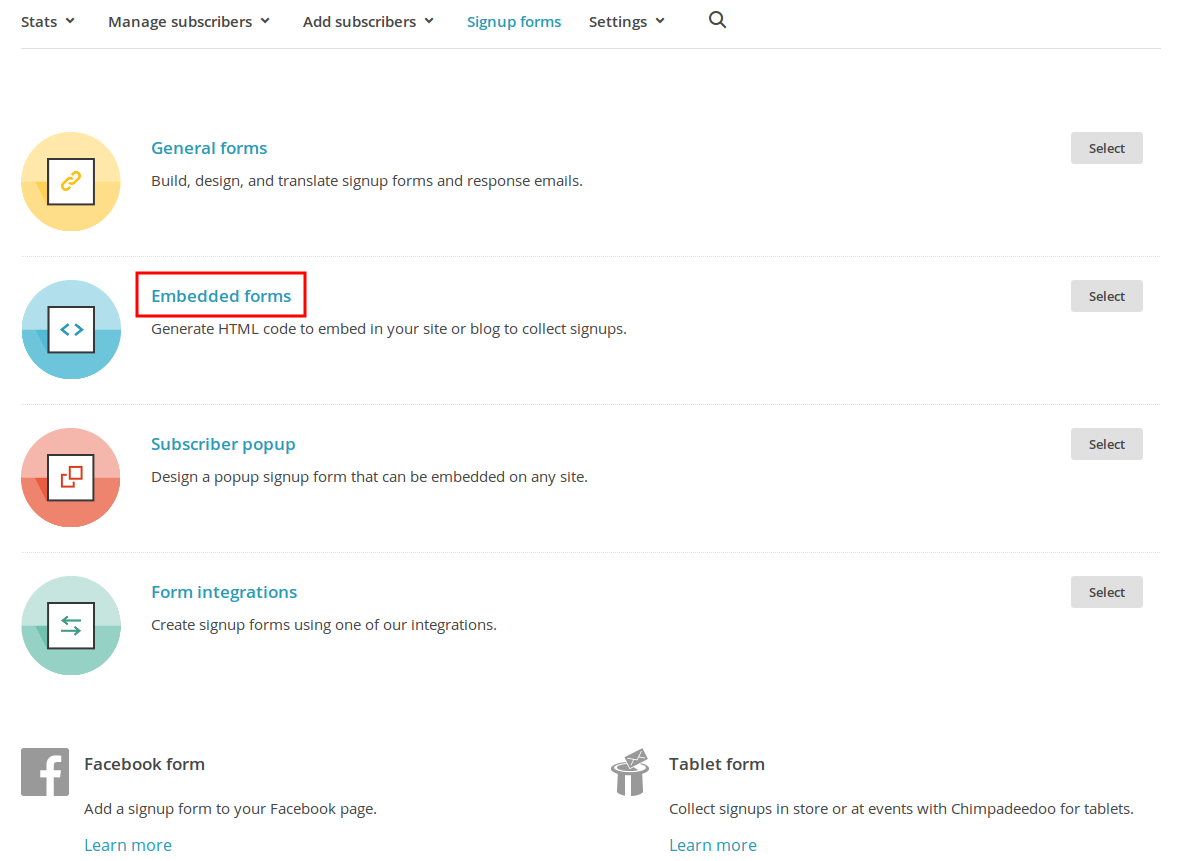 When you have a WordPress site and use a widget like Genesis eNews Extended or MailChimp for WordPress, a Naked Form is your best bet. Naked Forms are a kind of Embedded Form.
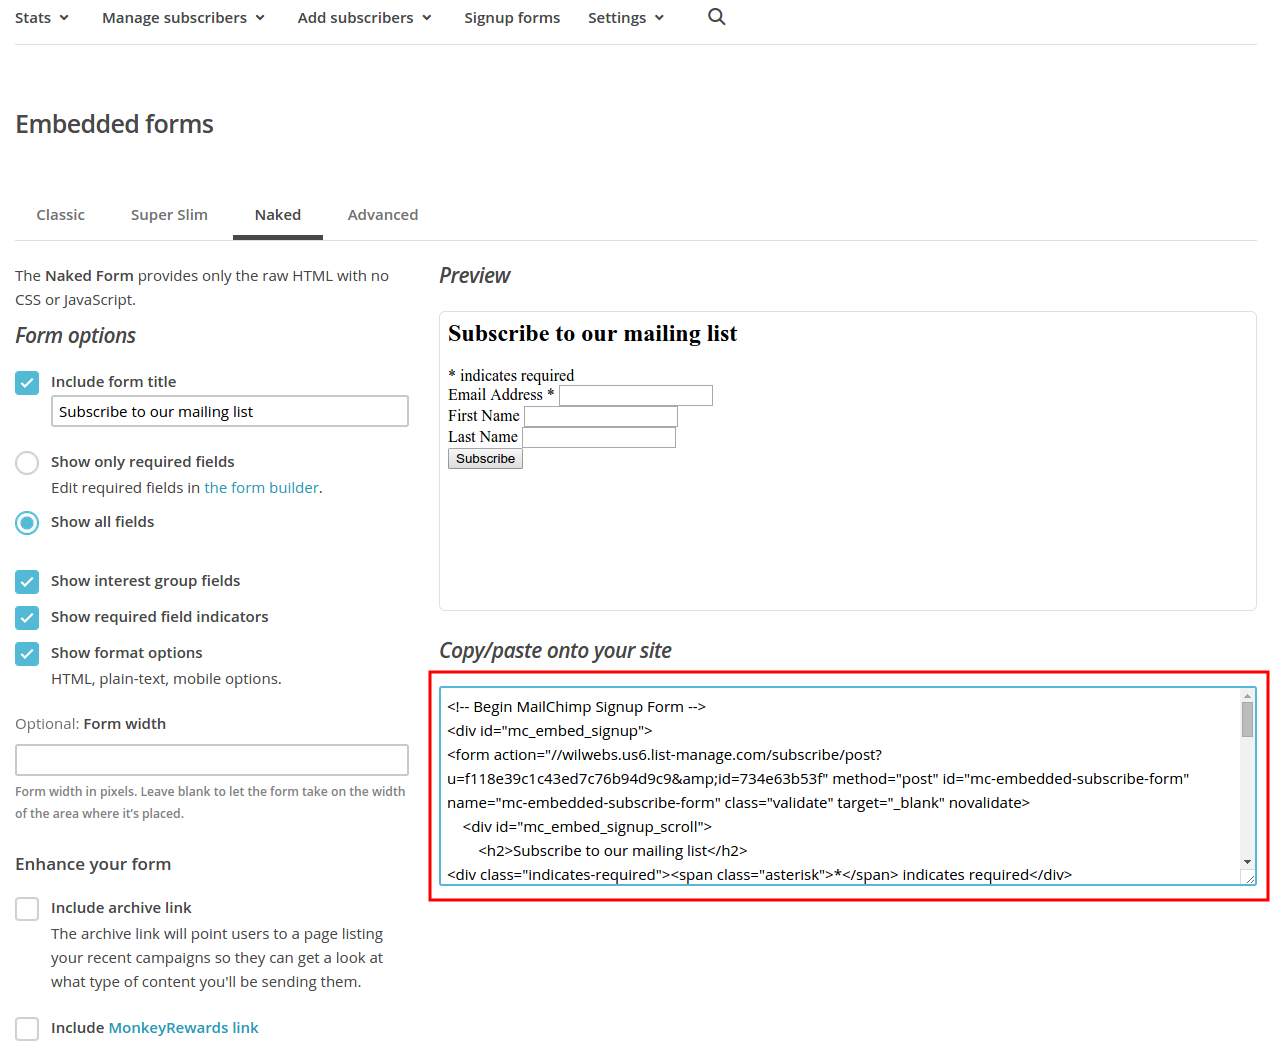 The Naked Form tool allows you to customize your form with the buttons and fields at the left. The result is shown at the right. At the top you see the naked form, and at the bottom you see the code regarding. It is possible to copy and paste that code into a text widget and style it with a little CSS.
However, for our eNews Extended or MailPoet widgets, we only need one line. That is the first value between double quotes after action. In this case that is:
//wilwebs.us9.list-manage.com/subscribe/post?u=1234567890abcdef&id=987654321
Configuring your subscribe widget
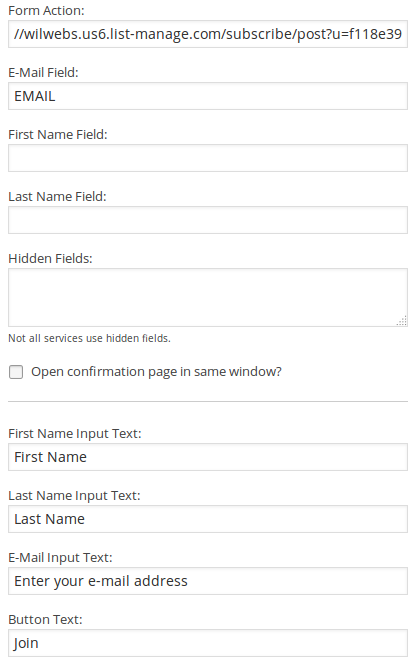 All you have to do is copy that one line into the Form Action field of your subscribe widget.
The Genesis eNews Extended widget allows you to collect the e-mail address, first name and last name from subscribers. The e-mail address is mandatory, the other two fields are optional.
Here on WPfy.me, entering the e-mail address is sufficient. The more details you ask in first instance, the higher the threshold. In addition, MailChimp allows subscribers to manage their preferences, including adding their first name and last name.
The required values for the E-mail Field in the widget is EMAIL, and for the First Name Field and Last Name Field are FNAME repectively LNAME.
It is critical that you use exactly these terms, since they tell MailChimp where to enter the subscriber’s details in the database.
The values entered at the Input Text fields at the bottom of the widget are displayed in the form on the website. There are no restrictions for these values as long as they make sense for potential subscribers.
Creating a MailChimp Campaign
With MailChimp you can create all kinds of e-mail marketing campaigns:
- Regular ol’ Campaign – based on a traditional HTML template with a plain text alternate
- Plain-Text Campaign – plain text e-mails only
- A/B Split Campaign – two small, almost identical mailings for conversion testing
- RSS-Driven Campaign – blog newsletters
When you are planning a MailChimp campaign as replacement for FeedBurner, you choose the last option – RSS-Driven Campaign.
Let’s create such a campaign. You have to walk through six screens: RSS Feed, Recipients, Setup, Template, Design, and finally Confirm.
As you can see in the screenshot here below, the names of these screens are listed at the bottom of your browser window as breadcrumbs. You can use these to jump back and fort when needed.
RSS Feed
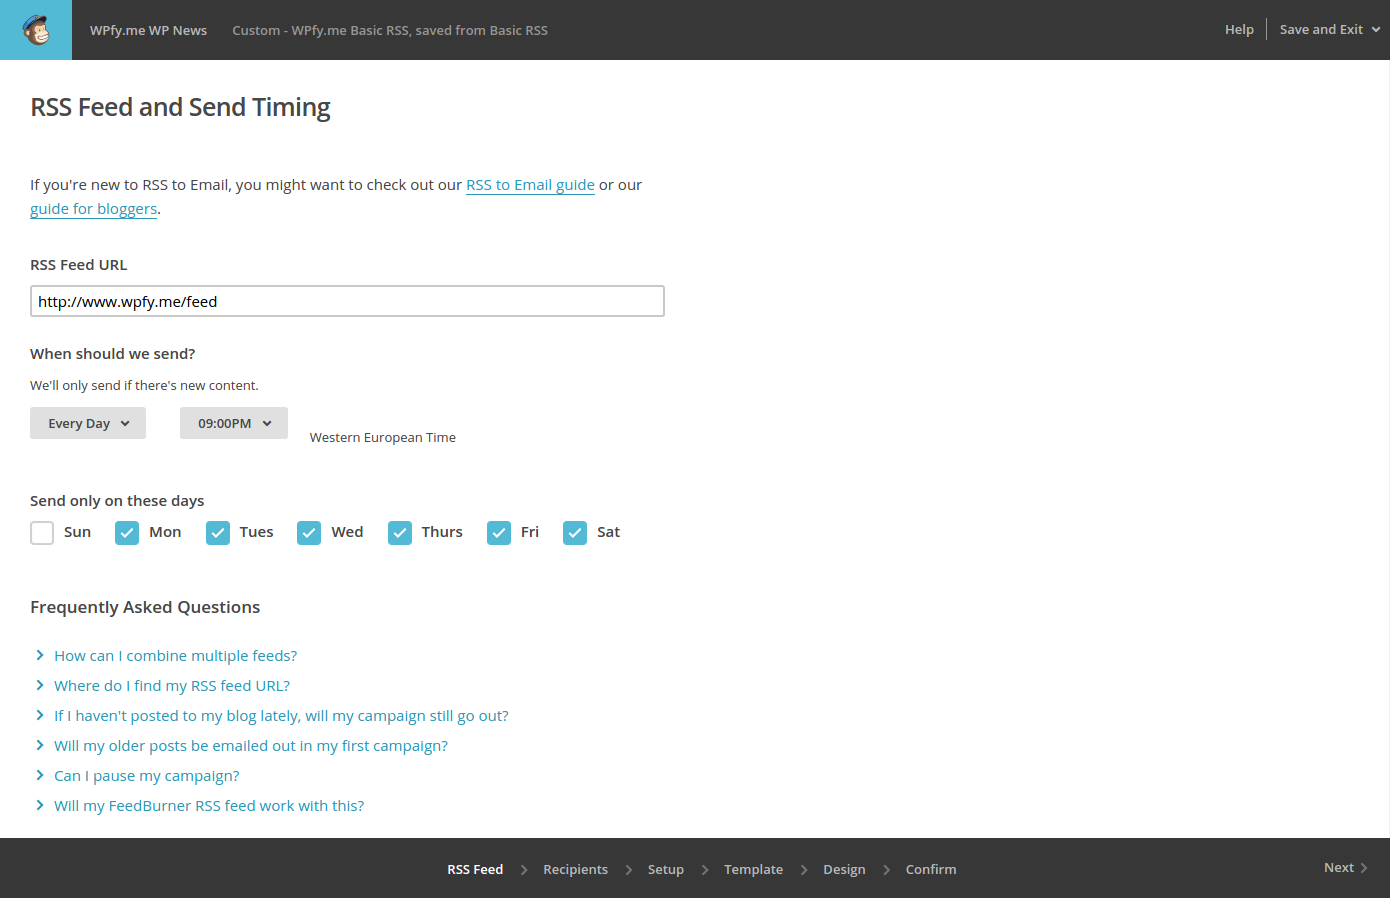 First you have to enter the URL of the RSS feed. WordPress’ default feed URL is formatted as http://domainname?feed=rss2. However, when you have enabled permalinks the feed URL is simply http://domainname/feed.
List
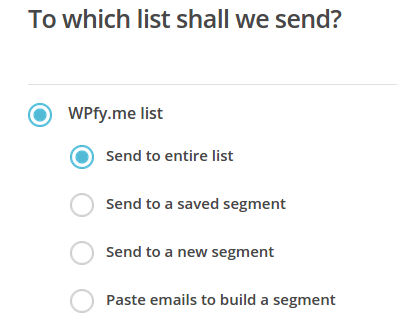 Next you select the desired list to send the e-mails to. You can send mailings to an entire list, or just a segment of a list. An RSS campaign will usually be dispatched to the entire list, but it is possible to split a list in two or more segments.
Setup
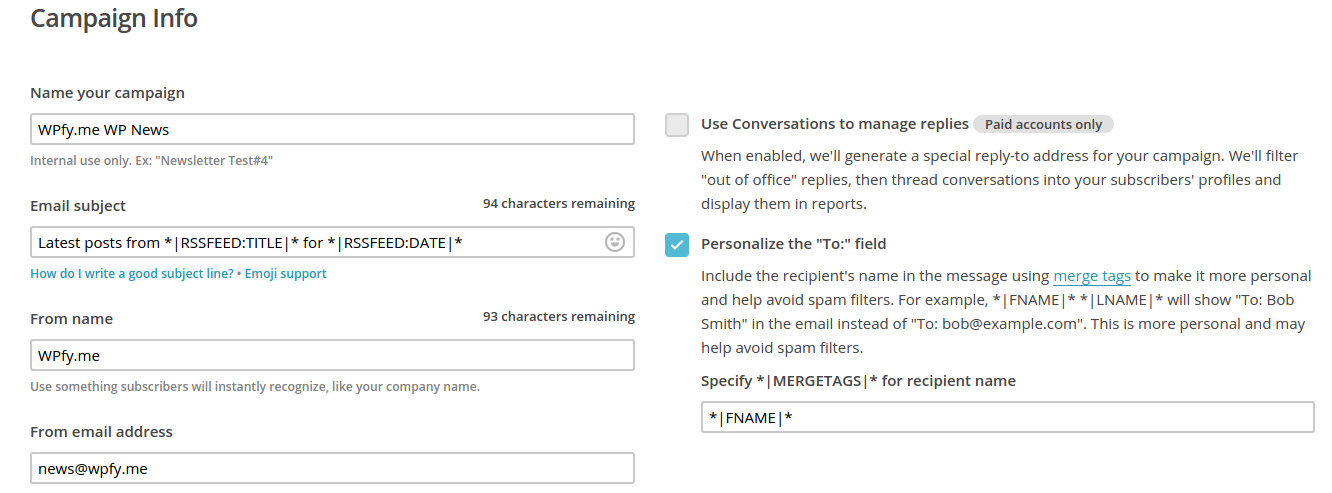 At the Setup screen you enter some general details regarding the campaign, such as a title, from name and e-mail address of the sender.
Template
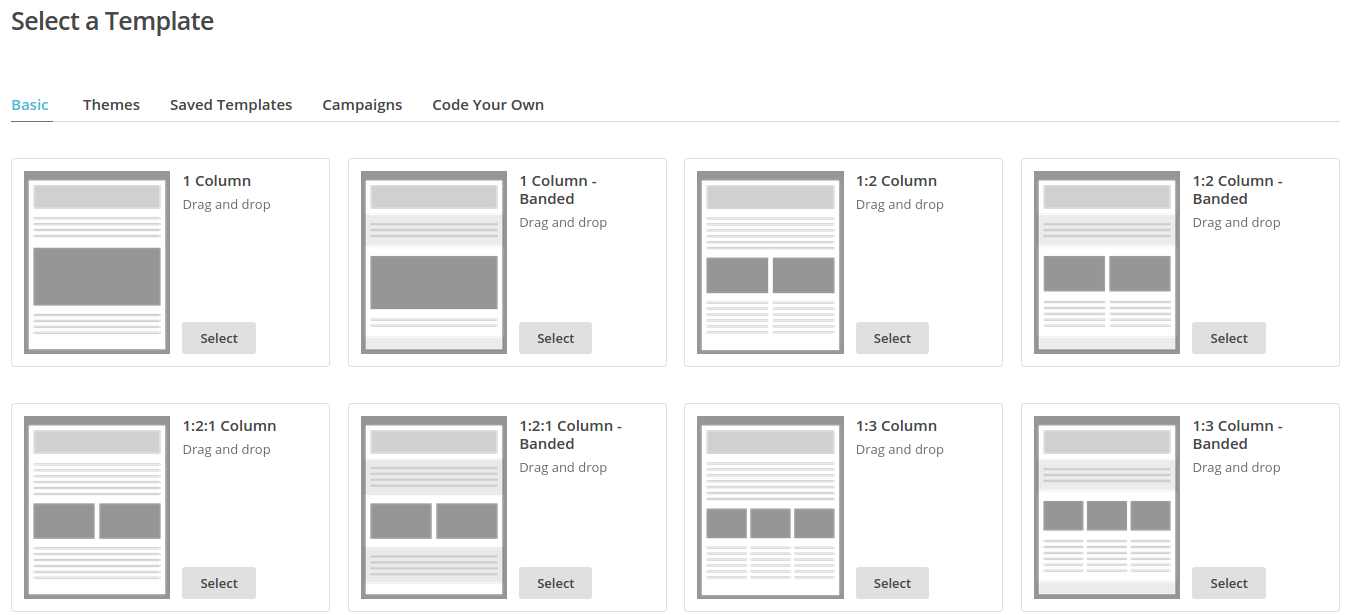 MailChimp lets you choose from 31 templates. A template provides the foundation for your e-mail message. For starters, you could select the RSS Basic at the bottom.
Design
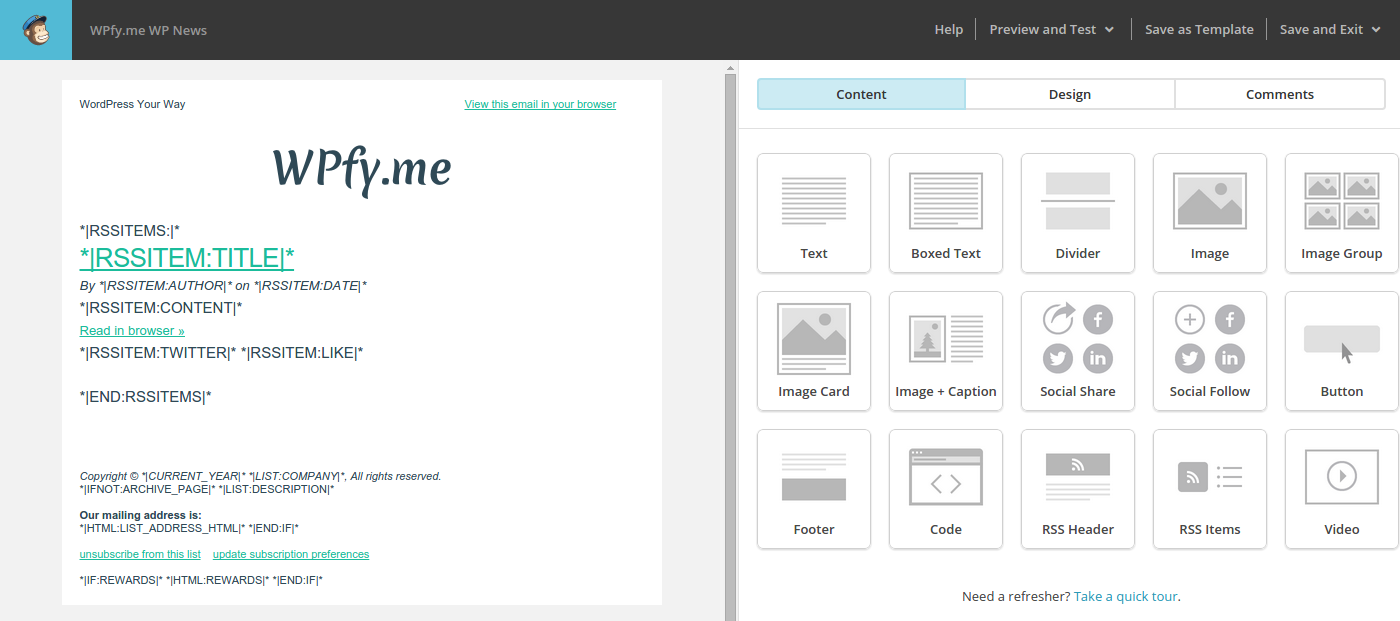 The Design screen is a very interesting one. Here you have the ability to adapt the template that you selected a step earlier. At the left you see the template including the template tags.
The right side of the screen displays serves three tabs: Content, Settings, and Comments.
Content displays the components that you can add, adjust, or remove from the template.
Design lets you customize elements from a component. You can for example change font-sizes and colors, and integrate images like your logo.
Comments shows you feedback from co-workers or partners.
With the Preview and Test link in the upper right corner, you have the opportunity to preview the e-mail message or even send it to yourself.
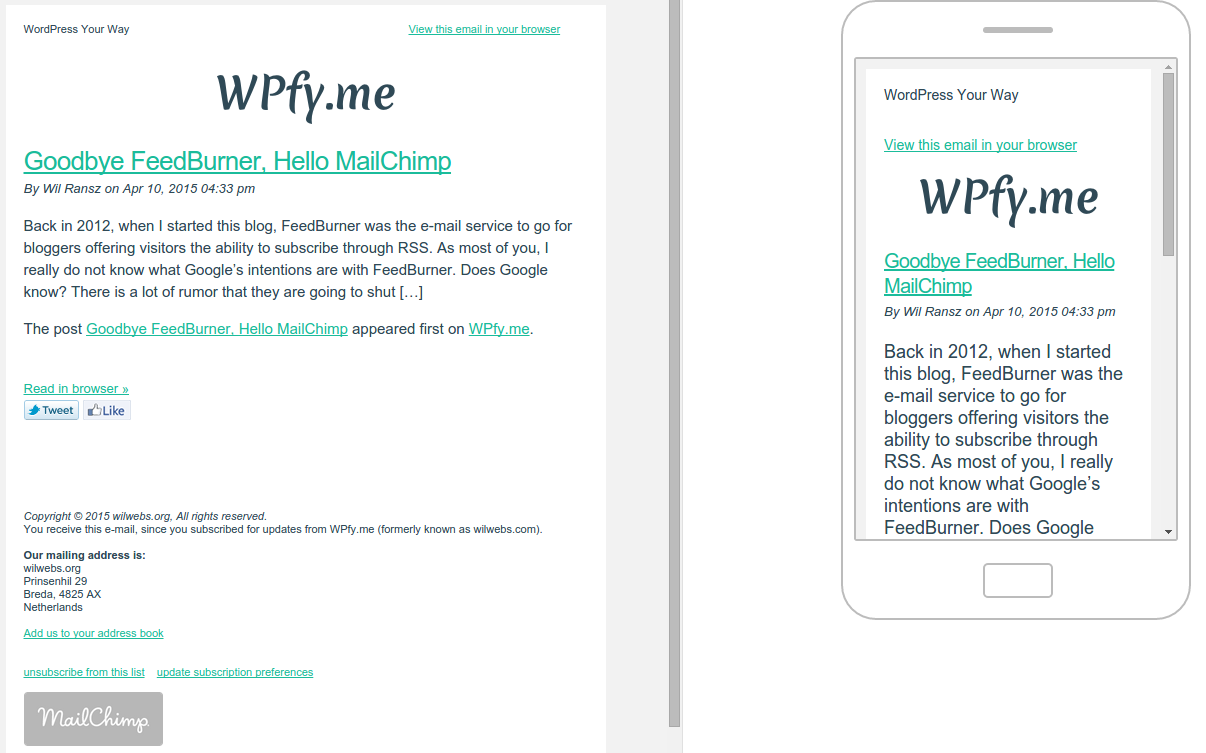 For the previews, MailChimp replaces the template tags with content from your most recent blog post. Left the e-mail as seen in e-mail clients, at the right the responsive version on smartphones.
The Save as Template link lets you save your templates, whether adapted or created from scratch. You can also download a template as HTML, make further adjustments (like styling links in hover state), re-upload the tweaked template, and use it in a campaign.
Confirm
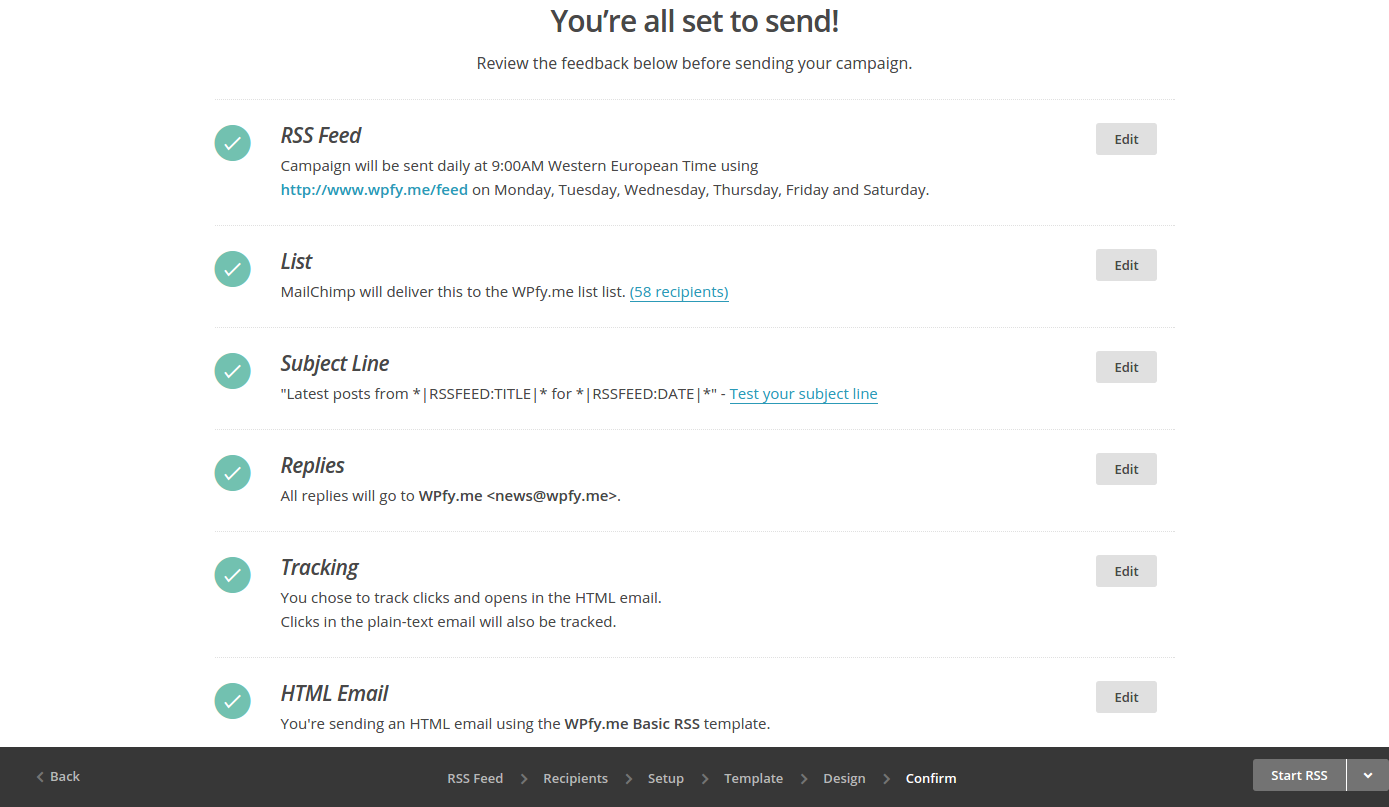 And finally, MailChimp presents you a checklist. Verify that you have completed all necessary steps. When needed, you can easily go back with the breadcrumbs navigation at the bottom.
When you are satisfied, you are ready to hit the [Start RSS]-button.
Done
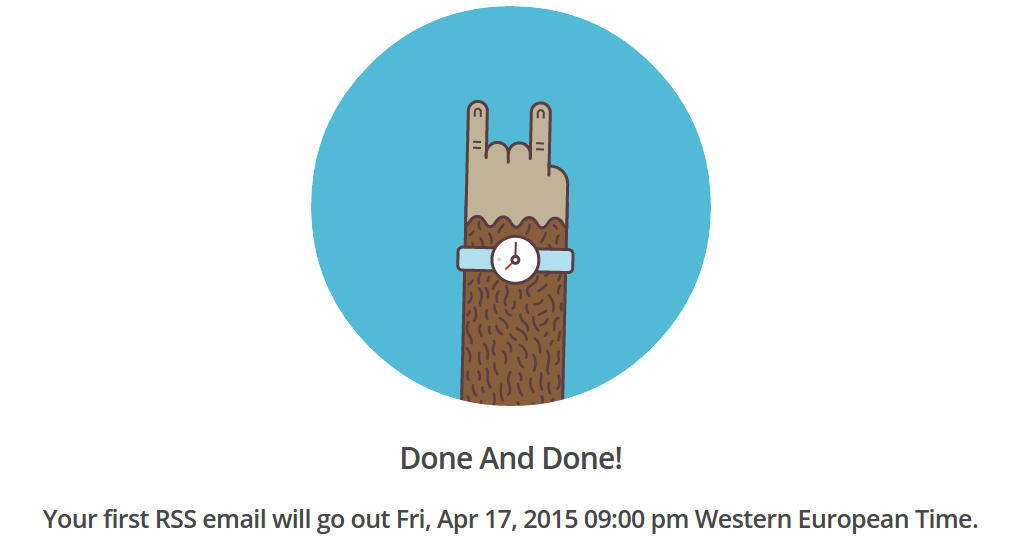 The Done And Done page confirms that you have successfully created a RSS campaign. It also informs you when the next dispatch has been scheduled.
All that there is left for you to do, is create a blog post so that MailChimp has something to send to your list.
MailChimp pricing plans
MailChimp is a freemium service with three pricing plans. The basic package named Entrepreneur has some limitations, but it is forever free. And more importantly, it probably offers everything you need to get started.
You are no longer qualified for the free plan, when you have a list – or when your lists altogether have – more than 2,000 e-mail addresses, or when you send out more than 12,000 e-mails a month.
The two premium plans are dubbed Growing Business, respectively High Volume Sender. The first one has a ceiling of 50,000 addresses, the other one continues from there.
Of course, when you really need a premium feature like automation, delivery by time zone, or Social Pro, having less than 2,000 addresses is no obstacle for signing up for a premium plan. These plans start at $500 a month.
Wrapping up
The past few months, I have migrated all my blogs from FeedBurner to MailChimp. To be honest, I wish I had done it sooner. Well, better late than never.
What do you think? Are you considering MailChimp? Or are you already using MailChimp, or any other premium e-mail service?